> For the complete documentation index, see [llms.txt](https://docs.satoshiterminal.io/llms.txt). Markdown versions of documentation pages are available by appending `.md` to page URLs; this page is available as [Markdown](https://docs.satoshiterminal.io/research-suite/user-guide/getting-started.md).
# Getting Started
## **Account Setup**
**How to open**
Select Tools, Advanced Settings from the main menu.
**Account setup**
The Account setup dialogue consists of four subcategories:
**Login**
In addition to the username and password from the settings window, it is possible to enter IP Address and Port information.
There are only a few special cases, where the IP Address field may need to be changed. Client services may guide you further .
**Proxy**
These settings are for advanced users. Consult your network administrator if possible.
**Automatic Configuration**
This is used if your network administrator supplies an automatic configuration script (with proxy information, usually .pac files or similar).
**Firewall Login**
Add your user name and password if you use a local firewall that requires a login for outbound connections.
**Folders**
Specifies where various data from the terminal should be stored. The folders must be unique, and the defaults are usually sufficient for most users.
## **Trades Ticker Setup**
Setup is available from the window tool menu.
**How to open**
Open "Horizontal Ticker" or "Vertical Ticker" from the main menu under Discover > Show more .
**Description**
Similar to the trades tab in the symbol overview, the trade ticker displays time and sales information. Instead of just showing trades for one symbol, the trade ticker can show trades for many symbols from a number of markets and asset classes.
To only show trades in symbols in your custom list, select "Filter on My List only".
The contents tab specifies which markets and asset classes (symbol types) you would like to see in the trade ticker. You can also select to only see symbols from a custom list.
The Display tab, contains options for which columns to show and also configures behavior such as smooth scrolling and color changes.
* Reverse direction: Default direction is down for a Vertical tickerline or from right-to- left for Horizontal tickerlines.
* Smooth scrolling: Will make the display of the ticker smoother.
* Color changes: indicates whether each Trade is to be displayed in colors if the price is up or down compared to the previous trading day.
The Filter tab can be used to remove uninteresting trades or to only show interesting ones. Options include minimum volume and value, broker codes and trade types.
**Columns**
* Setup is available from the window tool menu.
* Available columns are:
* Flags (country associated with the symbol's market)
* Symbol (ticker code)
* Description (instead of ticker code)
* Price (last trade)
* Arrows (indicates whether the last price is up or down compared to the previous trade)
* Volume (trade volume)
* B Id (Broker buyer ID. Only available for selected sources)
* S ID (Broker seller ID. Only available for selected sources)
* Bid (bid price at the time of the trade)
* Ask (ask price at the time of the trade)
* Time (time for the trade. Can be setup with seconds)
* Trades outside bid/ask price range are marked with a diverging color.
## Workspace Creation
Workspaces are a collection of desktops, while desktops are collections of windows. Workspaces can be compared to workbooks in Microsoft Excel while desktops can be compared to worksheets.
A workspace may contain several desktops. You may at any time add more market data windows, news windows, charts etc, as well as custom colors, fonts and window sizes to the desktops.
**Creating a Workspace**
It is easy to build up your own workspace by opening existing desktops in the desktop builder. Type in Desktops in the search field to get started.
**Save Your Own Personalized Workspace**
When you have built up your workspace with one or more desktops press Ctrl+S or open the Main menu, choose Workspace, and click Save.
**Default Workspace**
To save the workspace as default and have it open automatically the next time you open the terminal, select Workspace, Save as default from the Main menu.
**Open a Workspace**
Your default workspace will open when you start your terminal. You can easily save any workspace you have created "as default" by selecting "Save as Default" in the Workspace category in the Main menu.
If you have created more than one workspace, you can access them from the Workspace category of the main menu too. You can save as many workspaces as you like, but can only open one workspace at a time.
## Desktop Setup
**Opening a desktop**
Search for Desktop in the search field and choose the Desktop command or click the "+" button on the bottom left of the terminal.

Choose "Blank Desktop" to create your own, or load an existing desktop and customize it to suit your needs.
When saving a workspace, all opened desktops are stored in the workspace file.
Opened desktops show up as tabs in bottom left-hand corner (when running in floating mode the tabs are just below the top tool bar):

**Shortcuts**
To switch between desktops click on the tabs with your mouse. Or, use the keyboard shortcuts Alt+1, Alt+2 etc.
To move a window from one desktop to another, pin the window (see Window Tool menu) and change desktops, then unpin the window.
**Change the order of the tabs**
There are three menu options that allow you to freely move desktops around. These are available by right-clicking on the desktop tab, or by using keyboard shortcuts.
"Move desktop" will prompt you for a new desktop number for the desktop.
The Move desktop Left (Ctrl+Shift+PgUp) and Move desktop Right (Ctrl+Shift+PgDn) commands can be used to quickly move a desktop to another position.
## Focus Window
**How to open**
Open "Focus Window" from a symbol's right-click menu. Choose Other > Focus Window.
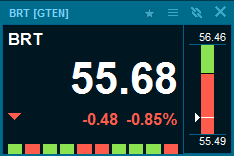
**Description**
The Focus Window gives the user a quick overview of one specific instrument. The symbol field can show either the ticker of full name of the instrument. The price field allows the user to select between last bid or ask, and below either change +/- change +/-% or both are displayed. At the bottom the change indicator will display the current trend based upon the price field. The right part of the window consists of a range panel, with values in both ends displaying today's high and low. An arrow indicates where the price is according to high/low, and the bar will be red on negative since open and blue on positive.
The focus window can be customized by going to the focus windows' window tool menu > Setup.
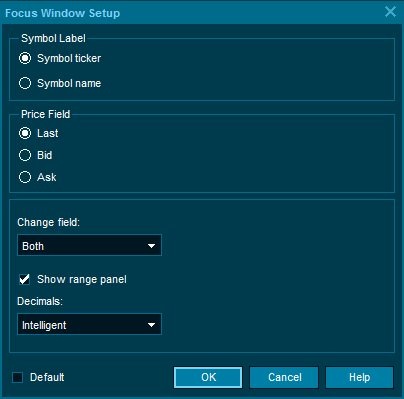
**Symbol label** - Choose between showing the "symbol ticker" and full "symbol name".
**Price field** - The focus window can show bid, ask or last prices. Some users choose to open two focus windows for the same symbol with one showing bid price and the other showing the ask price.
**Change field** - Choose to see %change, absolute change in price or both in the symbol window.
**Decimals** - It is possible to override the intelligent decimals settings by specifying exactly how many decimals the focus window should show for the
## Performance Configuration
**Optimized searching**
If you normally make very limited searches you can set search preferences to eliminate wider searches and avoid seeing those search results.
Set search type to "Only ticker" to search using the ticker codes and search scope to "Only in Workspace" or "Same market" to limit to local search only. Excluding certain asset classes will also speed up the search.

**Limit news look-up.**
If you do not need to see historical news - only intraday in the symbol overview window, select "Today" to stop the terminal from looking for historical news.

**Trade ticker coloring**
Under Preferences – User Interface – General you can now select to display Trade ticker coloring based on hitter/taker.
This feature is a visual tool which makes it easier read the tape and quickly see if the market or an individual instrument is being sold or bought.
Trades highlighted as green indicates that the offer was taken while red indicates the bid was hit.

The setting also applies to the Trades list in the Symbols
## Communication Status
The Communication status window displays all the connections you have to different servers in addition to a log file of connection activities.
**Connection Status**
Click the main menu icon, then on Tools and "Comms Status" to access the information. Alternatively, use the keyboard shortcut: CTRL+ALT+M.

**Disconnected: Strike through effect**
If your device loose connection to the internet, market data will indicate that the connection has been lost by striking out the prices.

**Feeds**
Each active connection in the terminal is displayed in this list. The overview displays the Status, IP address and BPS (Bits Per Second) for each source. The total bandwidth usage is shown in the right pane. For each feed you can tick on / off for warnings from the source.

**Log File**
The Log provides all communication that is exported when you use the send a "Mail to Support", available from the main menu.
